Now that we’re all travelling more, and work from home (wfh) is more widely accepted, there are times you’ll be wondering how to connect to hotel wifi without handing over all your data. There’s multiple ways to do this, with some being a bit more questionable than others.
How to connect to hotel wifi and protect your privacy
The obvious and more appropriate route to take is to fill in the details correctly. If your hotel chain is nice, they’ll offer you a simple and quick way to connect. Some hotels however will try grab as much data as possible and make connecting to the internet a pretty painful process. In this case, you might want to give them a disposable email address so you don’t keep getting their spam once you’ve checked out. You might also need to provide a room number, in this case give them your room number or another neighbouring room number. By providing a temp mail address and a different number you’ll remain more anonymous while online as activity is often recorded against the details you’ve just provided.
It’s important to remember when using captive portals that they intercept your page load, and then redirect you to their captive portal (especially on mobile). Macs offer an in-built feature for these portals, but if you’re still having issues with connecting to the hotel wifi, you might have more success by using a website which doesn’t use SSL to allow them to effectively ‘hijack’ your connection, like http://neverssl.com.
Connecting the firestick to a hotel wifi captive portal
You can also connect your firestick to hotel wifi captive portals without issue as it supports captive portals no problem. Other devices such as PlayStations and xBoxes however might struggle a little as they don’t always know how to respond to these pages.
If you’re this far and you’re still wondering how to connect to hotel wifi, then you migth be best off spoofing your mac address. A word of warning though, this isn’t good practice and you most likely should not be doing this in the first place. But in the name of information sharing, here goes!
How to connect to hotel wifi by spoofing your mac address
You’ll first want to find your mac address and keep that somewhere safe so you can return it to its defaults later on. You’ll then want to scan the network for other connected devices, taking note of a few mac addresses you might like to try and use. After this you’ll then need to change your address to the desired address and pretend to be them.
This trick works as the router will have already registered this mac address and effectively “white-listed” it, meaning you’ll be left alone. Where this doesn’t work so well is if both devices are trying to use the internet at the same time. You’ll notice that your connection is slow, or doesn’t work at all. So while this method works, it’s only really good for short period of time.
Time needed: 2 minutes
- Finding your mac address
Open terminal and enter the following command
ifconfig en0 | awk '/ether/{print $2}'. This will return you your current mac address. Keep this safe. - Scan for other devices on the network
In a new terminal window, enter the following command
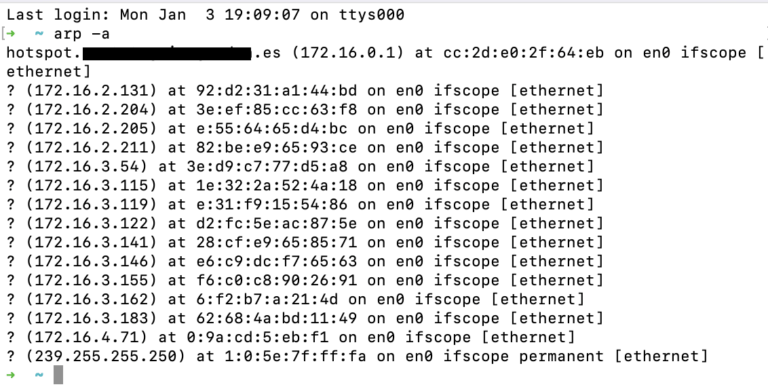
arp -a. This will print all the other devices on the network. Some might be named, and give you an idea of how frequently they’re used – which is handy when we’re trying to not cause issues on the network.
- Update your mac address
Enter the following command which will update your mac address
sudo ifconfig en0 xx:xx:xx:xx:xx:xx. Hopefully at this point you should have internet and you’ll be good to go. If you run in to issues, or you have no connection, try another mac address. - Reset your mac address
Once you’re done, you’ll want to reset your mac address, for this place the address provided in step 1 into the command in step 3.
You should now hopefully have a working internet connection! This trick has saved me a few times while abroad with some very flakey captive portals. In most cases you’ll never need this, and you should probably never use it anyway.
Getting the xBox and PlayStation working
You’ve seen how to change your MAC address above, now if your xbox and other devices won’t connect to the hotel wifi as they don’t support captive portals, we can use the MAC trick in reverse. By looking up your game consoles MAC address and setting your laptop as that, you’ll be tricking the network into thinking that your game console has already gone through the process. All that remains is to switch the laptop back to its old address, and then connect your xbox to the network. You should now be able to play games as normal.
Your best bet though is to simply provide a name and disposable temp mail where possible. You’ll retain your privacy, and hopefully not need to mess around with your devices network settings.
Posted on: January 3, 2022 by Patrick